ชื่อตาราง marked as crashed and should be repaired
นี่เป็นวิธีแก้ไขอย่างง่าย ด้วยคำสั่งดังต่อไปนี้
#myisamchk -r -q tbl_name
อย่างกรณีของจะได้ผลลัพธืดังต่อไปนี้
- check record delete-chain
- recovering (with sort) MyISAM-table 'hb_log'
Data records: 808714
- Fixing index 1
จากนั้นลองมาตรวจสอบดู พบว่า ถ้าพบว่าข้อมูลในตารางมาครบ ก็เป็นอันจบเรียบร้อย
วันพฤหัสบดีที่ 3 กุมภาพันธ์ พ.ศ. 2554

วันอาทิตย์ที่ 26 ธันวาคม พ.ศ. 2553
ฮองอินโบ ชูซากุ
ตอน 1 : http://www.youtube.com/watch?v=DPxT6_jLM_E
ตอน 2 : http://www.youtube.com/watch?v=9tISwwB7Z3U
ตอน 3 : http://www.youtube.com/watch?v=hnfJ4YUmV6A
ตอน 4 : http://www.youtube.com/watch?v=qnal7pyAZRM
ตอน 5 : http://www.youtube.com/watch?v=a4xYlDRKrqU
ตอน 6 : http://www.youtube.com/watch?v=4ma_ExsfOTw
ตอน 7 : http://www.youtube.com/watch?v=Cr6R1VQgqpY
ตอน 8 : http://www.youtube.com/watch?v=ONYR4I5LFPo
ตอน 9 : http://www.youtube.com/watch?v=qi7sShHOa5M
ตอน 10 : http://www.youtube.com/watch?v=OziBnbG2A3k
ตอน 11 : http://www.youtube.com/watch?v=hZnmpyclIjQ
ตอน 2 : http://www.youtube.com/watch?v=9tISwwB7Z3U
ตอน 3 : http://www.youtube.com/watch?v=hnfJ4YUmV6A
ตอน 4 : http://www.youtube.com/watch?v=qnal7pyAZRM
ตอน 5 : http://www.youtube.com/watch?v=a4xYlDRKrqU
ตอน 6 : http://www.youtube.com/watch?v=4ma_ExsfOTw
ตอน 7 : http://www.youtube.com/watch?v=Cr6R1VQgqpY
ตอน 8 : http://www.youtube.com/watch?v=ONYR4I5LFPo
ตอน 9 : http://www.youtube.com/watch?v=qi7sShHOa5M
ตอน 10 : http://www.youtube.com/watch?v=OziBnbG2A3k
ตอน 11 : http://www.youtube.com/watch?v=hZnmpyclIjQ
วันจันทร์ที่ 20 ธันวาคม พ.ศ. 2553
Ruby on Rails ติดตั้ง ImageMagick สำหรับการ Resize รูปภาพ
บางครั้งเราก็ต้องการ Ruby on Rails เว็บไซต์ที่มี การย่อขยายรูปภาพ ดังนั้น ก็ต้องลงโปรแกรมเกี่ยวกับตัวจัดการรูปภาพซะหน่อย
เริ่มต้นด้วย ImageMagick ก่อน
ImageMagick: /usr/ports/graphics/ImageMagick
[root@nginx81 ~]# cd /usr/ports/graphics/ImageMagick/
ติดตั้ง ruby-rmagick (A Ruby binding for ImageMagick)
# cd /usr/ports/graphics/ruby-rmagick
# make install clean
จากนั้น ลง gem mini_magick เพื่อให้ Ruby on Rails สามารถ เรียกใช้งานต่อได้
# gem install mini_magick -v=เวอร์ชั่นที่อยากได้ (ผมใช้ Rails 2.3.5 ใช้ mini_magick ได้ 1.2.5 ถึง 1.3.3)
ให้ลงตามลำดับที่เขียนมานะครับ ไม่งั้น มันไม่ work ทดลองอยู๋หลายครั้งหล่ะ ไม่รู้ว่าเป็นเพราะสาเหตุอะไร (คาดว่า ตอนลง gem mini_magick มันมา build จาก lib ในเครื่องอีกที ดังนั้นถ้าลง lib magick ไม่ครบ มันก็จะไม่สมบูรณ์มั้ง)
เริ่มต้นด้วย ImageMagick ก่อน
ImageMagick: /usr/ports/graphics/ImageMagick
[root@nginx81 ~]# cd /usr/ports/graphics/ImageMagick/
ติดตั้ง ruby-rmagick (A Ruby binding for ImageMagick)
# cd /usr/ports/graphics/ruby-rmagick
# make install clean
จากนั้น ลง gem mini_magick เพื่อให้ Ruby on Rails สามารถ เรียกใช้งานต่อได้
# gem install mini_magick -v=เวอร์ชั่นที่อยากได้ (ผมใช้ Rails 2.3.5 ใช้ mini_magick ได้ 1.2.5 ถึง 1.3.3)
ให้ลงตามลำดับที่เขียนมานะครับ ไม่งั้น มันไม่ work ทดลองอยู๋หลายครั้งหล่ะ ไม่รู้ว่าเป็นเพราะสาเหตุอะไร (คาดว่า ตอนลง gem mini_magick มันมา build จาก lib ในเครื่องอีกที ดังนั้นถ้าลง lib magick ไม่ครบ มันก็จะไม่สมบูรณ์มั้ง)
วันอาทิตย์ที่ 19 ธันวาคม พ.ศ. 2553
การติดตั้ง Git Server
บทความนี้เป็น บทความพื้นฐานก่อนที่จะไปยังเรื่องอื่นๆครับ
บทความนี้เป็นการทำ git repository ผ่าน ssh ใน home ของเราเองนะ
ติดตั้ง git ผ่าน port
# whereis git
# cd /usr/ports/devel/git
# make install clean
หลังจากการติดตั้งเรียบร้อย ก็ล็อกอินปกติเข้า home ของตัวเอง โดยเราจะ ทดลองสร้าง ตัวเก็บ repos ให้กับ project1
# เครื่อง Git Server
$ mkdir git
$ cd git
$ mkdir project1.git
$ cd project1.git
$ git --bare init
# เครื่อง Notebook (Git development)
$ mkdir project1 # สร้างโปรเจคใหม่ อยู่ใน folder นี้
$ touch readme.txt # สมมุติไฟล์ ขึ้นมา 1 ไฟล์
$ git add README # เพิ่มไฟล์ เข้าสู่ระบบ git (ในเครื่องตัวเอง)
$ git commit -m 'first commit' # บันทึกการเปลี่ยนแปลง
$ git remote add origin ssh://username@venus.demotest.com:1822/~/git/project1.git
# ตั้งค่า git server ให้ โปรเจคนี้รู้จัก
$ git push origin master # อัพเดตสถานะ ไฟล์ที่มีการเปลี่ยนแปลง กับ git server ที่ตั้งค่าไว้
จะได้ผลลัพธ์ประมาณนี้
Counting objects: 3, done.
Writing objects: 100% (3/3), 209 bytes, done.
Total 3 (delta 0), reused 0 (delta 0)
To ssh://nutjang@venus:2022/~/git/project1.git
* [new branch] master -> master
ไปที่เครื่อง Git Server
$ cd ~/git/project1.git
$ git log
Author: User
Date: Wed Dec 15 21:50:04 2010 +0700
first commit
นั่นเหละ แปลว่า เครื่อง notebook อัพเดต status ของ source code มาเก็ยไว้ที่ Git Server เรียบร้อยแล้ว
บทความนี้เป็นการทำ git repository ผ่าน ssh ใน home ของเราเองนะ
ติดตั้ง git ผ่าน port
# whereis git
# cd /usr/ports/devel/git
# make install clean
หลังจากการติดตั้งเรียบร้อย ก็ล็อกอินปกติเข้า home ของตัวเอง โดยเราจะ ทดลองสร้าง ตัวเก็บ repos ให้กับ project1
# เครื่อง Git Server
$ mkdir git
$ cd git
$ mkdir project1.git
$ cd project1.git
$ git --bare init
# เครื่อง Notebook (Git development)
$ mkdir project1 # สร้างโปรเจคใหม่ อยู่ใน folder นี้
$ touch readme.txt # สมมุติไฟล์ ขึ้นมา 1 ไฟล์
$ git add README # เพิ่มไฟล์ เข้าสู่ระบบ git (ในเครื่องตัวเอง)
$ git commit -m 'first commit' # บันทึกการเปลี่ยนแปลง
$ git remote add origin ssh://username@venus.demotest.com:1822/~/git/project1.git
# ตั้งค่า git server ให้ โปรเจคนี้รู้จัก
$ git push origin master # อัพเดตสถานะ ไฟล์ที่มีการเปลี่ยนแปลง กับ git server ที่ตั้งค่าไว้
จะได้ผลลัพธ์ประมาณนี้
Counting objects: 3, done.
Writing objects: 100% (3/3), 209 bytes, done.
Total 3 (delta 0), reused 0 (delta 0)
To ssh://nutjang@venus:2022/~/git/project1.git
* [new branch] master -> master
ไปที่เครื่อง Git Server
$ cd ~/git/project1.git
$ git log
Author: User
Date: Wed Dec 15 21:50:04 2010 +0700
first commit
นั่นเหละ แปลว่า เครื่อง notebook อัพเดต status ของ source code มาเก็ยไว้ที่ Git Server เรียบร้อยแล้ว
วันศุกร์ที่ 17 ธันวาคม พ.ศ. 2553
การใช้งาน Git ทั้งครั้งแรก และ ครั้งต่อๆ ไป
First commit:
on local laptop:
mkdir example
cd example
git init
touch README
git add README
git commit -m 'first commit'
git remote add origin ssh://git@gate.example.org:22111/~/example.git
git push origin master
When programming:
# we need to clone the repository for one time:
git clone ssh://git@gate.example.org:22111/~/example.git
# ====
# then every time we want to edit some files:
cd example
git pull # pull the newest version from the repository
# after changing some files:
git commit -a -m 'msg' # commit the changes with a message msg
git push # push the changes to the repository
on local laptop:
mkdir example
cd example
git init
touch README
git add README
git commit -m 'first commit'
git remote add origin ssh://git@gate.example.org:22111/~/example.git
git push origin master
When programming:
# we need to clone the repository for one time:
git clone ssh://git@gate.example.org:22111/~/example.git
# ====
# then every time we want to edit some files:
cd example
git pull # pull the newest version from the repository
# after changing some files:
git commit -a -m 'msg' # commit the changes with a message msg
git push # push the changes to the repository
วันพุธที่ 15 ธันวาคม พ.ศ. 2553
การ ssh เข้าเครื่อง โดยไม่ถาม password (public, private key)
ขั้นตอนนี้ถือเป็น การเตรียม SSH ให้พร้อม สำหรับ capistrano ครับ
บทความนี้จะสอนตรง การ ssh เข้าเครื่อง โดยไม่ถาม password (public, private key)
ในที่นี้จะสมมุติ เครื่องมา 2 เครื่องคือ
1. เครื่อง development (Notebook) อยู่ที่บ้าน ต่อเน็ตบ้าง ไม่ต่อเน็ตบ้าง
2. เครื่อง production (Server) วางไว้ที่ IDC เชื่อมต่ออินเตอร์เน็ตตลอดเวลา
กรณีนี้ ผมอยู่หน้าเครื่อง Notebook และ ต้องการจะเข้าเครื่อง production แบบไม่ต้องใส่ password ให้ทำตามขั้นตอนดังนี้ครับ
เครื่อง development
$ ssh-keygen -t rsa
Enter file in which to save the key (/home/xxxxxxx/.ssh/id_rsa):
Enter passphrase (empty for no passphrase): enter
Enter same passphrase again: enter
Your identification has been saved in /home/xxxxxxx/.ssh/id_rsa.
Your public key has been saved in /home/xxxxxxx/.ssh/id_rsa.pub.
The key fingerprint is:
27:fa:3c:E7:2b:32:4d:75:08:89:0f:29:a2:33:d3:9d xxxxxxx@demo
The key's randomart image is:
+--[ RSA 2048]----+
| o. |
| .B..o |
| ..+.+ . |
| +..o E |
| o... S . |
| . . o |
| . . . |
| . +... |
| =o |
+-----------------+
เอาไฟล์ id_rsa.pub ไป ใส่ไว้ที่ .ssh ของเครื่อง production
$ scp ~/.ssh/id_rsa.pub xxxxxxxx@58.xxx.xxx.xx:.ssh/authorized_keys
เป็นอันเรียบร้อยคราวนี้ ที่เครื่อง development ควรจะ ssh username@เครื่อง production ควรจะ ไม่ถาม password
$ ssh xxxxxx@58.xxx.xxx.xx
>> ได้ prompt $ ของเครื่อง production
บทความนี้จะสอนตรง การ ssh เข้าเครื่อง โดยไม่ถาม password (public, private key)
ในที่นี้จะสมมุติ เครื่องมา 2 เครื่องคือ
1. เครื่อง development (Notebook) อยู่ที่บ้าน ต่อเน็ตบ้าง ไม่ต่อเน็ตบ้าง
2. เครื่อง production (Server) วางไว้ที่ IDC เชื่อมต่ออินเตอร์เน็ตตลอดเวลา
กรณีนี้ ผมอยู่หน้าเครื่อง Notebook และ ต้องการจะเข้าเครื่อง production แบบไม่ต้องใส่ password ให้ทำตามขั้นตอนดังนี้ครับ
เครื่อง development
$ ssh-keygen -t rsa
Enter file in which to save the key (/home/xxxxxxx/.ssh/id_rsa):
Enter passphrase (empty for no passphrase): enter
Enter same passphrase again: enter
Your identification has been saved in /home/xxxxxxx/.ssh/id_rsa.
Your public key has been saved in /home/xxxxxxx/.ssh/id_rsa.pub.
The key fingerprint is:
27:fa:3c:E7:2b:32:4d:75:08:89:0f:29:a2:33:d3:9d xxxxxxx@demo
The key's randomart image is:
+--[ RSA 2048]----+
| o. |
| .B..o |
| ..+.+ . |
| +..o E |
| o... S . |
| . . o |
| . . . |
| . +... |
| =o |
+-----------------+
เอาไฟล์ id_rsa.pub ไป ใส่ไว้ที่ .ssh ของเครื่อง production
$ scp ~/.ssh/id_rsa.pub xxxxxxxx@58.xxx.xxx.xx:.ssh/authorized_keys
เป็นอันเรียบร้อยคราวนี้ ที่เครื่อง development ควรจะ ssh username@เครื่อง production ควรจะ ไม่ถาม password
$ ssh xxxxxx@58.xxx.xxx.xx
>> ได้ prompt $ ของเครื่อง production
วันอังคารที่ 14 ธันวาคม พ.ศ. 2553
สั่งให้ nginx บีบอัด ไฟล์ ต่างๆ (เพื่อให้หน้าเว็บโหลดเร็วขึ้น)
สั่งให้ nginx บีบอัด ไฟล์ ต่างๆ (เพื่อให้หน้าเว็บโหลดเร็วขึ้น)
เพิ่ม config พวกนี้เข้าไปใน nginx.conf จากนั้น
#gzip
gzip on;
gzip_buffers 16 8k;
gzip_http_version 1.0;
gzip_comp_level 9;
gzip_proxied any;
gzip_types text/plain text/css application/x-javascript text/xml application/xml application/xml+rss text/javascript application/javascript application/css;
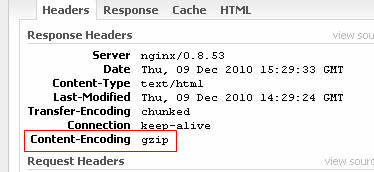
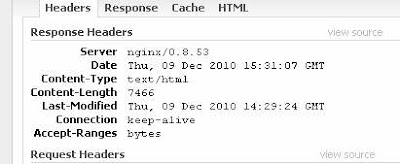
แล้ว จะเห็นว่า header ของ ก่อนเปลี่ยนและหลังเปลี่ยน จะแตกต่างกันดังรูป และเมื่อลองดูขนาดของไฟล์ที่ ต้องโหลดระหว่าง บีบอัด กับ ไม่บีบอัด จะมีแตกกันอย่างชัดเจน จาก 7k เหลือ 2.1k
เพิ่ม config พวกนี้เข้าไปใน nginx.conf จากนั้น
#gzip
gzip on;
gzip_buffers 16 8k;
gzip_http_version 1.0;
gzip_comp_level 9;
gzip_proxied any;
gzip_types text/plain text/css application/x-javascript text/xml application/xml application/xml+rss text/javascript application/javascript application/css;
แล้ว จะเห็นว่า header ของ ก่อนเปลี่ยนและหลังเปลี่ยน จะแตกต่างกันดังรูป และเมื่อลองดูขนาดของไฟล์ที่ ต้องโหลดระหว่าง บีบอัด กับ ไม่บีบอัด จะมีแตกกันอย่างชัดเจน จาก 7k เหลือ 2.1k


สมัครสมาชิก:
บทความ (Atom)